Recent Itinaries

6 Days: HCMC and Its Best Day Trips
Six days is the same five-day plan as before, Cu Chi and Tay Ninh, the Mekong, Vung Tau, a free city day, plus a genuine Can Tho overnight on top instead of pretending it fits into a single rushed day. Tighter schedule? The 5-day version drops Can Tho entirely. A full week? The 7-day plan adds the dawn Cai Rang floating market before heading home.
Book these before you go District 1 hotel for...
read more
7 Days: HCMC and Its Best Day Trips
A full week is enough to do all four real day trips plus the Can Tho overnight properly, dawn floating market included, instead of dropping any of them for time. This is the same six-day plan as before with one day added at the end, not a rebuilt itinerary. Shorter trip? The 6-day version drops the dawn market and heads home a day earlier.
Book these before you go District 1 hotel for nights one,...
read more
Saigon 2 Day Itinerary (No Tourist Traps)
Two days covers District 1’s history sights properly plus one honest Cholon detour, nothing more. Don’t try to squeeze in Cu Chi or the Mekong Delta on this trip; those belong on a longer stay or their own visit, covered separately in our Ho Chi Minh City Vietnam itinerary . Add a day at a time with our 3-day through 7-day versions.
Book these before you go:
Your District 1 hotel :...
read more
Saigon 3 Day Itinerary (No Tourist Traps)
Three days is our 2-day plan plus a third day for the museums and neighborhoods that don’t fit into a rushed weekend, still entirely inside the city. Day trips to Cu Chi or the Mekong Delta belong on a longer stay, covered in our Ho Chi Minh City Vietnam itinerary instead. Add more days with our 4-day through 7-day versions.
Book these before you go:
Your District 1 hotel : check rates...
read more
Saigon 4 Day Itinerary (No Tourist Traps)
Four days is our 3-day plan plus a fourth day that goes deeper into Cholon and adds a proper cooking class, still entirely inside the city. If a day trip to Cu Chi or the Mekong Delta is the priority instead, our Ho Chi Minh City Vietnam itinerary covers those properly. Keep adding days with our 5-day through 7-day versions.
Book these before you go:
Your District 1 hotel : check the neighborhood...
read more
Saigon 5 Day Itinerary (No Tourist Traps)
Five days is our 4-day plan plus a genuinely slower fifth day, still entirely inside the city. Anyone tempted to bolt on Cu Chi or the Mekong Delta here should book an extra night instead and use our Ho Chi Minh City Vietnam itinerary ; cramming a 60-90 minute-each-way day trip onto the tail of five city days is how people end up resenting both. Keep going with our 6-day and 7-day versions.
read more
Saigon 6 Day Itinerary (No Tourist Traps)
Six days is our 5-day plan plus a sixth day riding the metro out to Thu Duc, the newer riverside side of the city, still without leaving HCMC itself. If a genuine day trip out of town is what the extra day is for, use it on Cu Chi or the Mekong Delta instead, covered in our Ho Chi Minh City Vietnam itinerary . Add a final day with our 7-day plan .
read more
Saigon 7 Day Itinerary (No Tourist Traps)
Seven days is our 6-day plan plus a genuinely relaxed departure day, still entirely inside HCMC’s city limits. If a week is more time than the city itself needs, spend the extra days on Cu Chi and the Mekong Delta instead, both covered properly in our Ho Chi Minh City Vietnam itinerary rather than bolted on here as a rushed half-day. This is the longest version of this itinerary; work...
read more

Trinidad and Tobago 2 Day Itinerary No Traps
Trinidad and Tobago is one country split across two very different islands, and two days only covers one of them. Trinidad is the big, industrial, Carnival-mad half, home to the capital Port of Spain, sitting roughly 11km off Venezuela on the South American continental shelf, not on the volcanic island-arc most of the Eastern Caribbean sits on. This plan stays on Trinidad: Port of Spain’s...
read more
Trinidad and Tobago 3 Day Itinerary No Traps
Trinidad and Tobago is one country split across two very different islands, and three days still only covers one of them properly. Trinidad is the big, industrial, Carnival-mad half, home to the capital Port of Spain, sitting roughly 11km off Venezuela on the South American continental shelf, not on the volcanic island-arc most of the Eastern Caribbean sits on. Everything here prices in TT...
read more
Trinidad and Tobago 4 Day Itinerary No Traps
Trinidad and Tobago is one country, not one island. Trinidad is the big, industrial, Carnival-mad half, home to the capital Port of Spain, sitting roughly 11km off Venezuela on the South American continental shelf rather than the volcanic island-arc most of the Eastern Caribbean sits on; that’s also why the country lies largely outside the main Atlantic hurricane belt. Tobago is the small,...
read more
Trinidad and Tobago 5 Day Itinerary No Traps
Trinidad and Tobago is one country, not one island. Trinidad is the big, industrial, Carnival-mad half, home to the capital Port of Spain, sitting roughly 11km off Venezuela on the South American continental shelf rather than the volcanic island-arc most of the Eastern Caribbean sits on; that’s also why the country lies largely outside the main Atlantic hurricane belt. Tobago is the small,...
read more
Trinidad and Tobago 6 Day Itinerary No Traps
Trinidad and Tobago is one country, not one island. Trinidad is the big, industrial, Carnival-mad half, home to the capital Port of Spain, sitting roughly 11km off Venezuela on the South American continental shelf rather than the volcanic island-arc most of the Eastern Caribbean sits on; that’s also why the country lies largely outside the main Atlantic hurricane belt. Tobago is the small,...
read more
Trinidad and Tobago 7 Day Itinerary No Traps
Trinidad and Tobago is one country, not one island, and a week is the minimum for doing both properly. Trinidad is the big, industrial, Carnival-mad half, home to the capital Port of Spain, sitting roughly 11km off Venezuela on the South American continental shelf rather than the volcanic island-arc most of the Eastern Caribbean sits on; that’s also why the country lies largely outside the...
read more

Reunion 2 Day Itinerary (No Tourist Traps)
Two days on Reunion Island means choosing between the coast and one cirque, not attempting all three cirques and the volcano in a single trip. This plan pairs the west coast lagoon with Cirque de Cilaos, the one cirque that actually rewards a rushed visit, and it deliberately skips Piton de la Fournaise. If a blog tells you a weekend also fits the volcano, it has not driven the roads. Longer...
read more
Reunion 3 Day Itinerary (No Tourist Traps)
Three days on Reunion Island adds Piton de la Fournaise to the coast-and-Cilaos loop, which is the shortest plan that legitimately covers a cirque and the volcano without turning either into a drive-by. It still leaves Salazie, roadless Cirque de Mafate and the Piton des Neiges summit for a longer trip; those show up starting on the 4 day and 6 day versions, and the full loop is the 7 day...
read more
Reunion 4 Day Itinerary (No Tourist Traps)
Four days brings in Cirque de Salazie and its village Hell-Bourg, the second of Reunion’s three cirques, alongside the coast, Cilaos and the volcano from the shorter plans. Roadless Cirque de Mafate and the Piton des Neiges summit still do not fit; that is what the 6 day and 7 day itineraries are for. If 4 days already feels tight, the 3 day version drops Salazie and keeps the volcano.
read more
Reunion 5 Day Itinerary (No Tourist Traps)
Five days adds a genuine transfer day through the wild south and the Grand Brule lava fields on the way back into Cilaos, the price of accepting that nothing on this island connects two interior points without a detour back to the coast first. This is also the point where the Piton des Neiges summit starts to matter; it needs its own overnight, which is what the 6 day and 7 day plans add.
read more
Reunion 6 Day Itinerary (No Tourist Traps)
Six days is enough to add the hike up to the Gite de la Caverne Dufour below Piton des Neiges, Reunion’s other volcano and its highest point, but not enough to also catch the sunrise summit and descend in time for most flights home. That trade-off is the whole reason the 7 day itinerary exists; it is the shortest plan that adds the actual summit without cutting a corner. If the overnight...
read more
Reunion 7 Day Itinerary (No Tourist Traps)
Seven days is the shortest plan that covers Reunion Island properly: the coast, both drivable cirques, the volcano and a Piton des Neiges summit sunrise, without turning any single piece into a drive-by. Roadless Cirque de Mafate is the one thing that still does not fit; it needs its own separate trip, on foot over several days or by helicopter for an afternoon. Tighter on time? The 6 day...
read more
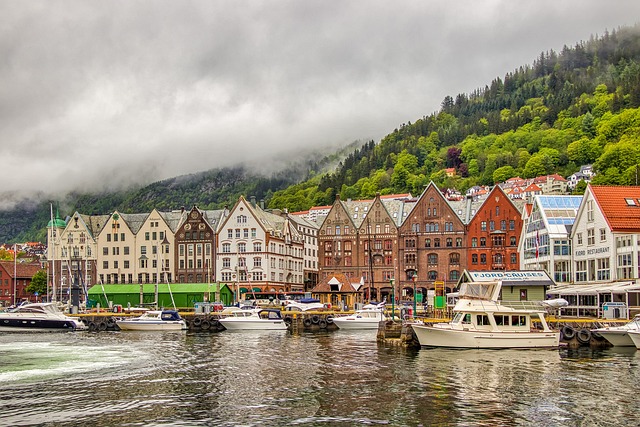
Bergen 2 Day Itinerary (No Tourist Traps)
Two days covers Bergen city and nothing else: Bryggen, the Fish Market, and one mountain. That’s honest, not a compromise, since the fjords deserve their own day. Add one with our 3-day itinerary , or build all the way up through our 7-day version . For the full list of what’s worth doing, see the Bergen guide .
Book these before you go:
Your Bryggen-area hotel : Norway’s hotel...
read more
Bergen 3 Day Itinerary (No Tourist Traps)
Three days is the minimum for Bergen plus one real fjord day trip: two city days, then Norway in a Nutshell. Shorter than this, skip the fjords entirely with our 2-day itinerary ; longer, and our 4-day through 7-day versions add the second mountain and a second fjord. See the Bergen guide for what’s worth doing beyond the day-by-day plan.
Book these before you go:
Your Bryggen-area hotel :...
read more
Bergen 4 Day Itinerary (No Tourist Traps)
Four days is enough to do both of Bergen’s mountains properly instead of rushing one, plus a full fjord day trip. This builds on our 3-day itinerary by adding the second viewpoint; go to our 5-day through 7-day versions for the museums and a second fjord. The Bergen guide covers what’s worth doing beyond the day plan.
Book these before you go:
Your Bryggen-area hotel : Norway’s...
read more
Bergen 5 Day Itinerary (No Tourist Traps)
Five days adds a proper museum and culture day to the city-plus-fjord plan: KODE, Bergenhus Fortress and Troldhaugen’s garden. This extends our 4-day itinerary ; go to our 6-day or 7-day versions for a second fjord day trip and a slower neighbourhood day. See the Bergen guide for the full worth-doing list.
Book these before you go:
Your Bryggen-area hotel : Norway’s hotel rates run...
read more
Bergen 6 Day Itinerary (No Tourist Traps)
Six days works in a second fjord day trip, the Hardangerfjord, alongside the city, both mountains and the museums. This extends our 5-day itinerary ; go to our 7-day version for a slower final neighbourhood day. See the Bergen guide for the full worth-doing list.
Book these before you go:
Your Bryggen-area hotel : Norway’s hotel rates run high regardless of season Floibanen funicular ticket...
read more
Bergen 7 Day Itinerary (No Tourist Traps)
Seven days is the full Bergen-plus-fjords circuit: two fjord day trips, both mountains, the museums, and a slower final day off the tourist track. This extends our 6-day itinerary ; if a week feels like too much city, our 2-day through 5-day versions cut it down. See the Bergen guide for the full worth-doing list.
Book these before you go:
Your Bryggen-area hotel : Norway’s hotel rates run...
read more
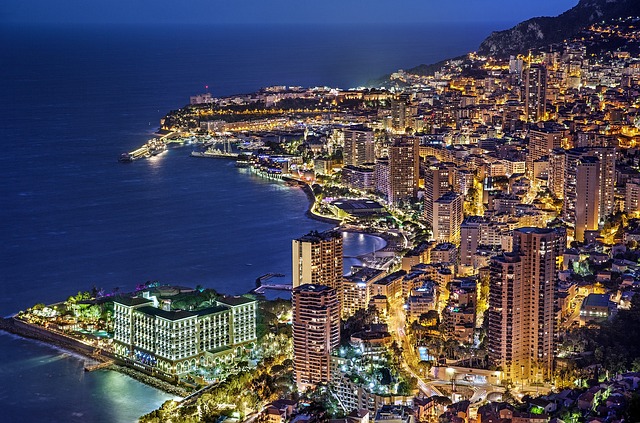
Monaco 2 Day Itinerary (No Tourist Traps)
Two days is enough for everything Monaco does well: Le Rocher and the Oceanographic Museum on day one, the casino district and the Jardin Exotique on day two. It is not enough time to add Nice or Eze without cutting something, so this plan treats Monaco as the whole trip. Want more? The 3-day version adds a Riviera day.
Book these before you go:
Oceanographic Museum timed ticket on GetYourGuide,...
read more
Monaco 3 Day Itinerary (No Tourist Traps)
This is the 2-day plan with one honest addition: Monaco itself runs out of new things by the end of day two, so day three goes to Nice, 22 minutes away by direct train. Days 1 and 2 cover Le Rocher, the museum, the casino tiers, and the Jardin Exotique. Day 3 is a full Riviera city, not more Monaco.
Book these before you go:
Oceanographic Museum timed ticket on GetYourGuide, worth pre-booking for...
read more
Monaco 4 Day Itinerary (No Tourist Traps)
This extends the 3-day plan with one more Riviera day. Days 1 and 2 are Monaco itself, Le Rocher through the Jardin Exotique. Day 3 is Nice. Day 4 is Eze, the perched village everyone photographs but few time correctly, the train only gets you to sea level.
Book these before you go:
Oceanographic Museum timed ticket on GetYourGuide, worth pre-booking for the Grand Prix (5-7 June 2026) or Yacht...
read more
Monaco 5 Day Itinerary (No Tourist Traps)
This extends the 4-day plan with Menton, the easier alternative to Eze for anyone whose legs are done with hills by day five. Days 1 and 2 are Monaco itself, Day 3 is Nice, Day 4 is Eze. Day 5 trades Eze’s climb for Menton’s flat, lemon-scented old town.
Book these before you go:
Oceanographic Museum timed ticket on GetYourGuide, worth pre-booking for the Grand Prix (5-7 June 2026) or...
read more
Monaco 6 Day Itinerary (No Tourist Traps)
This extends the 5-day plan with a cross-border day. Days 1 and 2 are Monaco itself, Day 3 Nice, Day 4 Eze, Day 5 Menton. Day 6 crosses into Italy for Ventimiglia, but only works as written if the date lands on a Friday, the market’s one real day.
Book these before you go:
Oceanographic Museum timed ticket on GetYourGuide, worth pre-booking for the Grand Prix (5-7 June 2026) or Yacht Show...
read more
Monaco 7 Day Itinerary (No Tourist Traps)
This is the full week: the 6-day plan plus Cannes, the furthest and biggest day trip on this list. Days 1 and 2 stay in Monaco, Days 3 to 6 run Nice, Eze, Menton, and Ventimiglia. Day 7 is Cannes, and honestly, by now Monaco has stopped being the point of the trip, which is fine, that is what a full week here actually looks like.
Book these before you go:
read more

Bagan 2 Day Itinerary (No Tourist Traps)
Two days is the minimum, not the ideal, but it’s enough to cover Bagan’s marquee temples properly if you don’t waste the first morning deciding where to start. This route hits Old Bagan’s core on day one and the deeper, quieter temples plus Myinkaba village on day two, on an e-bike, with no sunrise temple climb because that’s been illegal for years.
Book these before...
read more
Bagan 3 Day Itinerary (No Tourist Traps)
Three days is the honest sweet spot for Bagan: enough time for the marquee temples plus a slower day of getting lost, without outrunning the 3-day archaeological zone pass. This route covers Old Bagan on day one, Dhammayangyi and Myinkaba on day two, then the temples nobody photographs plus the actual working market on day three.
Book these before you go: a Nyaung-U or Old Bagan hotel is worth...
read more
Bagan 4 Day Itinerary (No Tourist Traps)
Four days is where Bagan starts needing help from outside the temple plain, since the ruins themselves are honestly a 2-3 day proposition. This route keeps the marquee temples and a slow day off the checklist, then spends day four on Mount Popa, the volcanic-plug pilgrimage site that’s the plain’s obvious extension, not filler.
Book these before you go: lock in a Nyaung-U or Old Bagan...
read more
Bagan 5 Day Itinerary (No Tourist Traps)
Five days means the temple plain no longer carries the whole trip on its own, and that’s fine, Bagan was never meant to be stretched past three days without help. This route keeps the marquee temples, a slow day off the checklist, Mount Popa, then adds Salay, a quiet colonial-era town most visitors skip entirely.
Book these before you go: a Nyaung-U or Old Bagan hotel is worth booking ahead...
read more
Bagan 6 Day Itinerary (No Tourist Traps)
Six days is honestly more than the temple plain needs, so be clear-eyed about what’s filling the extra time: Mount Popa, Salay, and a genuinely slower sixth day revisiting temples at a different hour, not padding disguised as sightseeing.
Book these before you go: a Nyaung-U or Old Bagan hotel for the full stay is worth locking in during the November-February peak, Balloons Over Bagan or the...
read more
Bagan 7 Day Itinerary (No Tourist Traps)
A full week is more than Bagan’s temple plain needs on its own, so this route is honest about where the extra days actually go: Mount Popa, Salay, a slower repeat day, and a Mandalay extension, not seven days of temple-hopping that would leave you burned out by day four.
Book these before you go: a Nyaung-U or Old Bagan hotel for the Bagan leg is worth locking in during the November-February...
read more

Armenia 2 Day Itinerary (No Tourist Traps)
Two days in Armenia is Yerevan plus the Garni Temple and Geghard Monastery loop, full stop. Not Khor Virap, not Sevan, and definitely not Tatev, that’s a full day south on its own and belongs in our 3-day through 7-day plans. Armenia runs on the dram (AMD, roughly 365-370 to the dollar), sits in the South Caucasus rather than anywhere near Russia, and its borders with Turkey and Azerbaijan...
read more
Armenia 3 Day Itinerary (No Tourist Traps)
Three days is our 2-day plan , Yerevan plus Garni and Geghard, with a full third day added south to Khor Virap, Noravank and the Areni wine region. It’s still not enough time for Tatev; that push needs its own overnight and shows up starting at our 6-day itinerary . Armenia uses the dram (AMD, roughly 365-370 to the dollar), is its own South Caucasus country rather than part of Russia, and...
read more
Armenia 4 Day Itinerary (No Tourist Traps)
Four days is our 3-day plan , Yerevan, Garni-Geghard, Khor Virap-Noravank-Areni, with a fourth day split between Etchmiadzin’s ancient cathedral and a second, slower pass through Yerevan itself. Still no Sevan, no Dilijan, no Tatev; those start at our 5-day and 6-day versions. Armenia runs on the dram (AMD, roughly 365-370 to the dollar), sits in the South Caucasus rather than anywhere near...
read more
Armenia 5 Day Itinerary (No Tourist Traps)
Five days is our 4-day plan , Yerevan, Garni-Geghard, Khor Virap-Noravank-Areni, Etchmiadzin, with a fifth day out to Lake Sevan and forested Dilijan. Tatev still doesn’t fit; that’s a separate overnight push covered starting at our 6-day itinerary . Armenia runs on the dram (AMD, roughly 365-370 to the dollar), is its own South Caucasus country rather than part of Russia, and its...
read more
Armenia 6 Day Itinerary (No Tourist Traps)
Six days is our 5-day plan extended one day south: Yerevan, Garni-Geghard, Khor Virap-Noravank-Areni, Etchmiadzin, Lake Sevan and Dilijan, then a sixth day pushing toward Tatev. Day 6 only gets you as far as Goris; actually riding the Wings of Tatev cable car is what the 7-day itinerary adds. Armenia runs on the dram (AMD, roughly 365-370 to the dollar), is its own South Caucasus country rather...
read more
Armenia 7 Day Itinerary (No Tourist Traps)
Seven days is our 6-day plan completed: Yerevan, Garni-Geghard, Khor Virap-Noravank-Areni, Etchmiadzin, Lake Sevan and Dilijan, the push south to Goris, and now a seventh day riding the Wings of Tatev cable car before the drive back. Armenia runs on the dram (AMD, roughly 365-370 to the dollar), is its own South Caucasus country rather than part of Russia, and its closed Turkey and Azerbaijan...
read more

Fiji 2 Day Itinerary (No Tourist Traps)
Two days in Fiji means Nadi plus one island day trip, not a rushed dash to the Yasawas. Land at Nadi, spend day one on the mainland’s best quick wins, then ride a Mamanuca day cruise on day two before you fly out. Add a day at a time and this same route grows into the 3 day and 7 day versions of this itinerary.
Book these before you go: the Mamanuca Islands Explorer day cruise sells out on...
read more
Fiji 3 Day Itinerary (No Tourist Traps)
Three days in Fiji is Nadi, one island day trip, and a Coral Coast run, not a padded Suva side quest. This builds directly on the 2 day version of this route by adding a full day on the Queens Road, and it nests inside the 4 day plan once you have time for an overnight island stay.
Book these before you go: the Mamanuca Islands Explorer day cruise , the Sabeto hot springs and mud pool , the Coral...
read more
Fiji 4 Day Itinerary (No Tourist Traps)
Four days in Fiji is the first version of this route with a real overnight island stay, not just a day cruise. It extends the 3 day plan by swapping a second Nadi night for a night in the Mamanucas, and it nests inside the 5 day version once you can spare more time on the water.
Book these before you go: the Sabeto hot springs and mud pool , the Coral Coast kava and Natadola combo tour , the...
read more
Fiji 5 Day Itinerary (No Tourist Traps)
Five days in Fiji stretches the 4 day plan’s single Mamanuca night into two, which is the real difference between sampling an island and actually resting on one. It nests inside the 6 day version once you are ready to trade a Mamanuca night for the remoter Yasawas.
Book these before you go: a Mamanuca resort room for two nights, which is the first thing to sell out in the dry season, the...
read more
Fiji 6 Day Itinerary (No Tourist Traps)
Six days in Fiji is where a Yasawa run finally makes sense. This trades the second Mamanuca night in the 5 day version of this route for a longer push north into the Yasawas, a genuine 2 to 8 hour boat leg each way that only pays off once you have this many days. It nests inside the 7 day plan once a Suva day fits.
Book these before you go: the Sabeto hot springs and mud pool , the Coral Coast...
read more
Fiji 7 Day Itinerary (No Tourist Traps)
Seven days is the first version of this route with room for Suva, and only because day 7 uses a 30 to 45 minute Fiji Airways hop instead of the 3.5 to 4 hour Queens Road drive. It builds directly on the 6 day plan , adding a genuine capital day rather than pretending Suva sits next door to the beach coast.
Book these before you go: a Suva hotel room for the one-night add-on, the Sabeto hot springs...
read more